It’s on a regular basis that I get messages from people who want advice on how to take better pictures with their camera and I am flattered! Alot of them are friends or past clients, but a growing majority is other photographers which is so awesome. I’m hoping this will be the start of a series that builds on each other with tips and tricks and just plain old education on taking your pictures from “cute” to “WHOA!” So this applies to those of you with a DSLR, that means your lens comes off the camera. A point and shoot is a camera where everything is all in one! For this purpose, we will focus on DSLR. I was and am proudly a Canon shooter, so forgive me if I am not accurate with Nikon. Hopefully I’ll give you enough that google can fill in the blanks 😉
Okay so here we go, three tips for better pictures RIGHT now.
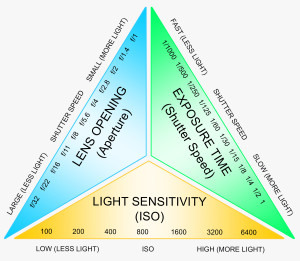
1. Learn what aperture, ISO and shutter speed are and how they relate to each other. This is known as the exposure triangle and is really the entire cornerstone (to me!) of photography.
If you have no idea what I’m talking about and are ready to click that box to retreat from this blog STOP! Let’s break it down here by thinking of your camera as an eye! Your eye has three major parts: an eyelid, a pupil and the retina. All three work together to control the light coming into your eye and produce an image for your brain, just like the three items above work to control light coming into your camera and produce an image on the sensor.
The camera eyelid aka shutter, can move really fast or really slow. A quick shutter let’s in a smaller amount of light then a slow shutter. Fast blink=little light and holding your eye open as long as possible=too much light. A quick shutter also freezes movement and a slow one allows drag. So kids and sports and things that move go ahead and bump that shutter speed up!
The camera pupil aka the aperture. This to me is where your images can really take a jump. If you have a lens that came with your camera you’re super limited by it because the aperture changes automatically. I always always recommend to just buy the body and snag yourself a
50 mm 1.4 lens! This is such a great portraits lens. Yes, it doesn’t zoom but you have feet and they are better anyways 😉 1.4 means that lens can open really wide and give you that nice creamy and speckled background (bokeh) setting your subject as the focus! Try shooting at 2.8 and then shoot at 5.6 and see the difference! Want more of a challenge? Try is at my favorite 1.4! WOW gorgeous! I always set my aperture first and change the other two to give me the better exposure. The other note is the lower your aperture (smaller number) the wider the pupil is but the more SHALLOW your depth of field is. Think that you really need something that is standing still and you can not be chasing! The more closed your aperture (higher) the deeper that field is and the more of the image that will be in focus.
The camera retina aka ISO. ISO just means how sensitive is your camera to light! A low ISO of 100 or 200 means the environment is giving off enough light you barely ned it. An ISO of 1600 means it’s pretty dark where you are standing and you need the camera to read every spare light source it can! The trick with ISO is the higher you go the grainier you get. If I need a high ISO I will lower my shutter speed(eyelid) and my it close(blink) slower!
2. Take your camera off that green square aka AUTO mode. Yikes this can be scary right?! You think, well I’ve paid alot of money for this nice piece of electronic equipment so it must be brilliant but that’s just sadly not the case! How nice it would be if every time my camera was turned on it snapped the perfect photo! I mean ideally we could be out of jobs quicker than I like to think. Luckily for me that is just certainly not the case. You’ve started learning the exposure triangle so using a camera on auto is counter productive. Set your camera to Av mode (aperture priority) if you want to keep the training wheels on a little more and bump your aperture to a good “portrait” one. 2.8 or 3.2 is great for smaller groups but 4.0 if you’ve got a large group is a good base! If you’re ready to just jump in, go to manual! Set your aperture, then your shutter speed, then your ISO. Inside the camera you will see a small bar that looks like a timeline and it goes from -3 to +3. This is an exposure meter. Change your settings to get it to be right on 0.
3. Seek best time for pictures! When I started I had no clue about best time of day for photos but now I will NOT shoot portraits in harsh light (weddings excluded because they don’t work around me usually). All my portraits are done the last two hours of the day but vary slightly depending on where we are. Downtown Norfolk with lots of buildings to block the sun I shoot two hours before. East beach where the sun sets on the water, I shoot an hour before. It all depends on location! If it’s the middle of the day, I’m looking for shade. We will leave it at that and eventually I will dive into the kind of shade but suffice it to say I look at the ground for a shady spot.
I hope these tips give you such a great chance to really improve your images immediately!
Remember if all else fails FIND THE LIGHT!! Forget about the background and look for favorable light. With a great image the background can fade away!!
Related

[…] you’re new around here, take a second and read THIS post before jumping into this one….go ahead. I’ll wait, I love any excuse for a second […]